Triggered Actions allow data manipulation, calculations and sending notifications by constructing application logic with a visual interface. They will be executed on specified events to perform actions on data in your tables. Changes in one table can affect data in other tables.
We have different types of Actions:
- Data modification actions:
- INSERT INTO – adding new record(s) to existing or new table
- DELETE FROM – removing existing record(s) from table
- UPDATE – changing existing record(s) in table
- Notification actions:
- SEND EMAIL
- SEND SMS
Triggered Actions can be executed through three data change events:
- on Insert – adding a new record(s)
- on Delete – deleting existing record(s)
- on Update – modifying existing records
One table can have multiple Triggered Actions associated to it, however only one instance of each event can be enabled at any given time per table. You can use multiple Actions in a Triggered Action.
Note: When implementing triggers, we recommend you work on a copy of your table(s) to test the functions before modifying live data.
You can access Triggered Actions in two ways:
- Hover over the table you wish to create a trigger on, then click More > Triggered Actions.
- Select the table by clicking the table name. This will open the Datasheet tab for the table. Then select the Triggered Actions tab.
Creating a Trigger
Complete the following steps to create a new Triggered Action:
- From the Triggered Actions tab of the table you want to base the trigger on, click New Triggered Action to begin.
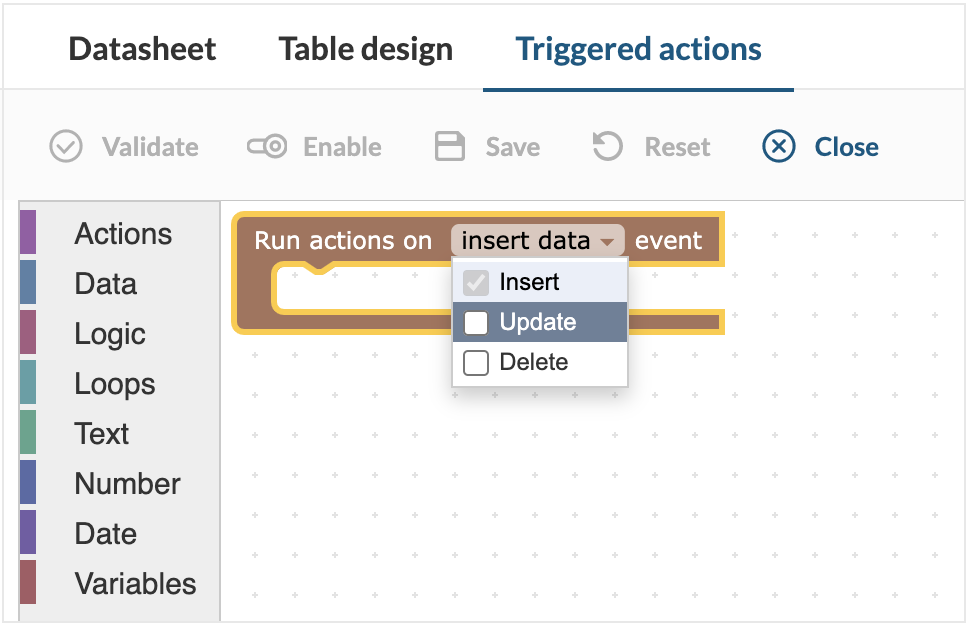
- On the following screen, you can select events on a table that can fire a trigger. You can choose between Insert, Update, and/or Delete as options for the event for which the Triggered Action will be executed.
- Choose an action that should run when the Triggered Action executes. When creating or modifying triggers, the left panel contains visual blocks available to use to build your Triggered Action. Select the Actions from the left hand menu, and click or drag-and-drop the Action block that corresponds to the operation you would like to perform. Action blocks are constructed using a SQL-like logic builder, which support INSERT, UPDATE, DELETE constructions, table(s) joining, data grouping and aggregations, EMAIL and SMS notifications.
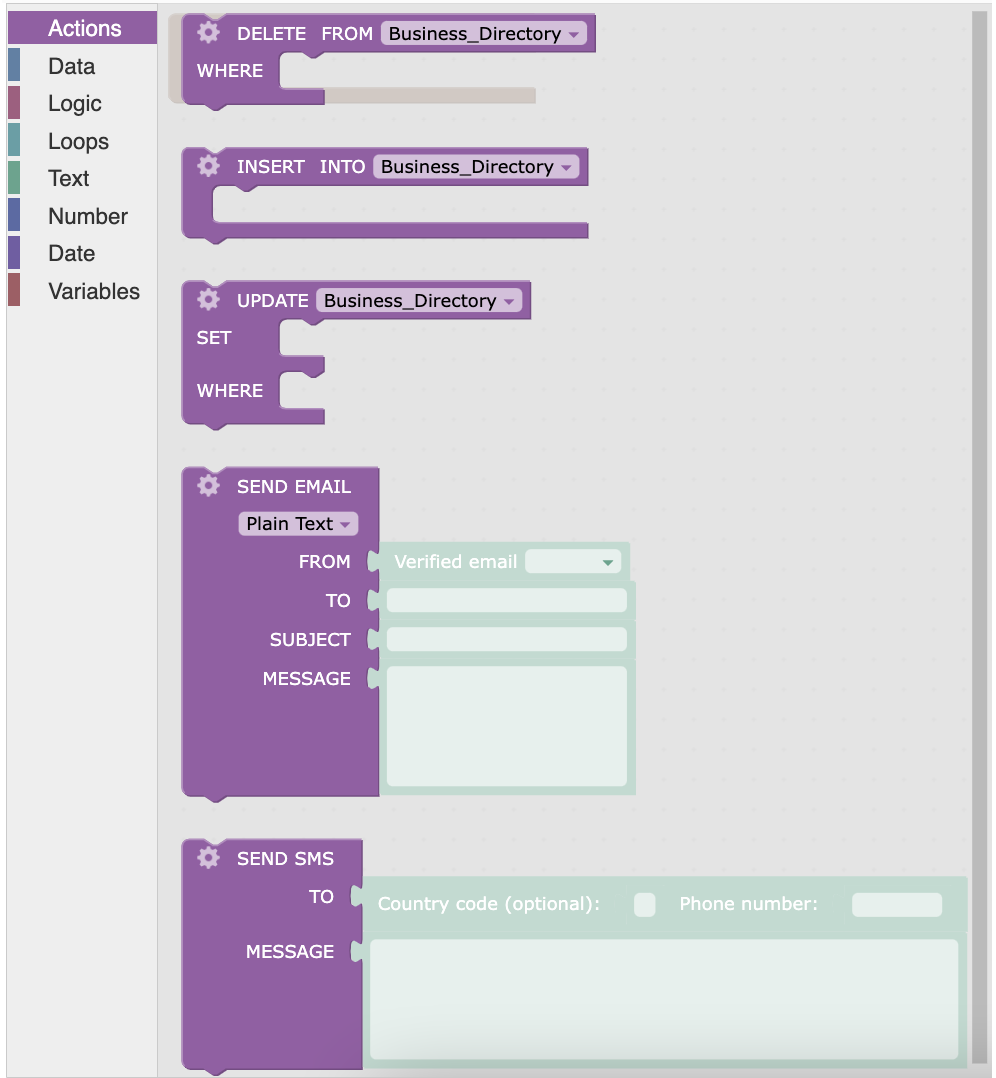
- For data modification in tables, select Action below:
- INSERT INTO
- DELETE FROM
- UPDATE
By clicking the gear icon in the Action block, you can access options to limit number of records affected with Top, combine fields from one or more tables with Join, and limit records with criteria with Where.

- For notifications, select Action below:
- SEND EMAIL
- SEND SMS
By clicking the gear icon in the notification Action block, you can access options to include additional recipients, specify reply-to email address or retrieve data from tables to use in the subject or message body.
- Other calculation elements for data selection, data manipulation and defining application logic are available in the left panel. These additional blocks can be dragged and dropped to complete building the Triggered Action.
| Element Type | Description |
|---|---|
| Data | Selecting and defining of constants to be used in the Triggered Action including SELECT statements. |
| Logic | Conditional and comparison type blocks to modify trigger behavior including IF/THEN/ELSE and AND/OR functions. |
| Loops | WHILE block to create sequences of instructions that are repeated as long as a given condition is true. FOR EACH block to create custom conditions that execute repeated actions for each record of a data source. |
| Text | String manipulation and static constants including substring, trim and concatenate operations. |
| Number | Mathematical operators and static constants including basic arithmetic and random numbers. |
| Date | Date modification operators and static dates including timestamp and date difference. |
| Variables | User-defined variables for holding static values or results of calculations and table variables for temporarily storing a set of records, which can be used as the data source for other Action blocks. |
- You can optionally select Validate from the upper menu to check the correctness of your trigger.
- Once the validation completes without error, click on Save from the top menu.
- Name your trigger and then select either Save or Save & Enable.
Additional Notes about Triggered Actions
- Depending on your Caspio plan, the maximum number of affected records and the nested level, which is the maximum number of Triggered Actions executed after the event that fired the Triggered Action, can vary.
-
-
- Maximum number of affected records – the sum of records which can be selected, updated, inserted, or deleted per event that fires the Triggered Actions or per task run.
- Maximum number of nested levels – Triggered Actions can be chained by the Triggered Action executed with an event or a task. As in the example below, for a plan configured with one nested level for Triggered Actions, when a record is inserted to table A, both Triggered Actions in tables A and B will be executed.
Table Triggered Actions A Run on Insert, has Triggered Action to update Table B B Run on Update, has Triggered action to update Table C C No Triggered Actions -
- The #inserted table represents data that is being inserted or updated in the table.
- The #deleted table represents data that is being deleted from the table.
- In the case of referential integrity enabled in a relationship, if a trigger executes on an insert event to the parent table, and inserts a record to the child table, the Triggered Action will fail. This is due to the action of inserting a record to the child table occurring first, thus failing the integrity check as the parent record does not yet exist.
- If cascade update and/or delete are enabled with referential integrity options, these events will not execute Triggered Actions via update or delete events.
- Triggered Actions currently will not run from import of data through either manual import or DataHub tasks.
- Only one Triggered Action can be Active per event type in a table. If you attempt to enable a Triggered Action with the same event, the other Triggered Action will be disabled.
Best practices
Test Triggered Action on a Copy of a Table
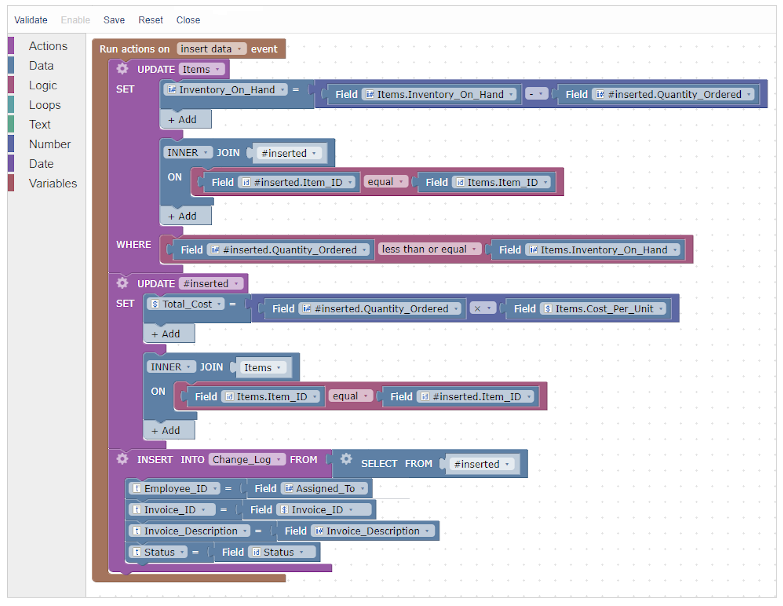
It is recommended when initially creating a Triggered Action to create a duplicate of the table(s) that will be modified by the trigger. This is to prevent accidental modification or deletion of live data. Once the Triggered Action has been tested, you can then recreate the trigger using the live table. It is also recommended to export the live data so that in case of loss of data, you can import the data to recover information that may be lost. The overall best practice in creating Triggered Actions is to avoid enabling them on live data until you have tested the behavior and have verified it is functioning as you desired. The alternative option would be to export your entire application prior to creating the Triggered Action so that in the event of any loss, the application can be fully re-imported and place back into the state it was prior to the trigger.Combine Actions
A single Triggered Action may contain multiple Actions. These multiple actions will execute in a top down hierarchy. In the example below, the Action of Update Items will be the first to run, and the Insert Into Change Log, will be the final Action to be run. By combining multiple Actions, you can manipulate data in multiple tables on a single executed Triggered Action.