The Attachment data type fields allow users to upload files through forms and store them directly in a table. This functionality is useful for applications that require storing documentation or media specific to individual records, such as screenshots relevant to customer support tickets, medical reports for individuals, or proposals for sales opportunities or leads.
You can configure the following settings for attachment fields:

  • Select the file types that users can upload in the field.
  • Define the minimum and maximum file size.
  • Enter alt text and title for images.
  • Generate resized image files for optimal use on DataParts, including images with increased pixel ratio for Retina displays.

The configuration that you set in the table design view is reflected in the Datasheet, on DataParts, and in REST API.

Learn how to add and manage attachment fields and uploaded files:

Configuring attachment fields in table design
Configuring attachment fields in forms
Adding attachments through the Datasheet
Managing attachments in the Datasheet

Steps for configuring an attachment field in table design:

To allow users to upload files through forms, add an Attachment data type field to a table.

  1. Create a new table or open an existing table in the design mode to add a field.
    For more information, see Modifying a Table’s Design.
  2. In the first empty row, enter a name for the field and select the Attachment data type.
  3. In the Options pane on the right, in the Permitted file types list, select the extensions that you want to allow in the field:
    • To allow only specific file types, select the checkboxes for the extensions that you want to accept in the field.
    • To allow all the file types in the list, at the bottom of the drop-down list, select the Select all checkbox.
      With this selection, the system does not allow files with extensions that are not included in the drop-down list.
    • To allow any file types without any restrictions, at the bottom of the drop-down list, clear the Select all checkbox.

    By default, all file types are allowed.

  4.  In the File size restrictions section, enter the minimum and maximum size requirements for the uploaded files.
    The maximum allowed size that you can set is 1,024 MB.
  5. Optional: In the Image options section, choose how you want to process uploaded images:
    • To generate smaller .webp images of different sizes to use in DataParts for improved performance, select the Smart resizer checkbox.

      Note: Smart resizer works only if the original file is smaller than 10 MB and neither of its dimensions (width or height) is larger than 5,000 pixels.

      If the original image dimensions allow it, Smart resizer generates files that are smaller than the original, out of the available presets:

      • Thumbnail – 100x100 pixels
      • Small – 200x200 pixels
      • Medium – 640x640 pixels
      • Large – 1000x1000 pixels
    • If you enabled Smart resizer, to create additional image files with increased pixel ratio for high-resolution displays, select the Optimize for Retina displays checkbox.
      Depending on how many images are generated for Smart resizer, the following additional files are created with increased pixel ratio:
      • 2x sizes: 200x200, 400x400, 1280x1280, 2000x2000 pixels
      • 3x sizes: 300x300, 600x600, 1920x1920, 3000x3000 pixels
    • To add a short description of the image used by screen readers and displayed when the image is not loaded, in the Alt text field, enter the text that you want to show.
    • To add a short on-hover message for the image, in the Title field, enter the text that you want to show.
  6.  Optional: If you want to add optional information about this field as a note to yourself and other authors, in the Description field, enter the text to display.
  7. In the toolbar, click Save.

Result: The uploaded files will be checked and processed according to your requirements. You can now follow one of the procedures below to set up forms for users to upload their files through your app or upload files directly in the Datasheet yourself.

Note: If you change the field configuration, such as the file size restrictions or the allowed file types, the files that are already uploaded are not deleted even if they do not comply with the new requirements.

Steps for configuring an attachment field in forms:

After adding and configuring an Attachment data type field in your table, set up the File upload form element with user controls for managing the files in Sign-up forms, Submission forms, and Details/update forms.

  1. Create or edit a form where you want to enable file upload.
    For more information on how to create and edit forms, see the steps for the appropriate form:
  2. In the editing dialog box for the form, in the Select fields step, in the Data source panel, select a table or view that contains the Attachment data type field.
  3. In the Available fields panel, select the fields you want to use in your form, including the Attachment data type field, and then click Next.
  4. In the Configure fields step, in the Elements panel, select the Attachment data type field.
  5. On the General tab, configure the field settings:
    1. In the Form element list, select the field display:
      • To show only the file preview, select Display only.
      • To show controls for uploading and managing files, select File upload.
    2. Optional: In the Label field, enter the text to display next to the field.
    3. Optional: In the Hint field, enter the text to display in the tooltip.
    4. In the Show file as selector, choose if you want to display the file preview in the field as text, image, or both.
    5. For previews displayed as text or text and image, in the Text options tab, choose whether to show the file type icon and the file size information, and whether to use the file name as the display name or enter custom text.
    6. For previews displayed as image or text and image, in the Image options tab, choose whether the preview image fills up the available space or uses specific dimensions.
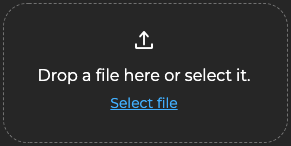
    7. If you selected File upload as the form element in step 5a., on the Drag & Drop uploader tab, configure to either use default labels for the uploader controls or enter custom texts.
    8. On the Action tab, choose what happens when users click the file preview.
      You can enable file download, redirect to a specific URL, or expand the file. The available options vary depending on the file type.
  6.  On the Layout tab, configure the field display.
  7. Click Save.

Result: The Attachment data type field is displayed on the selected form. On the rendered DataPart, users can interact with the field based on your selections.

Sample drag-and-drop uploader view.

Sample file preview in the drag-and-drop uploader.

Steps for adding attachments through the Datasheet:

  1. Open a table where you want to upload a file.
  2. On the Datasheet tab, in the Attachment data type field, click the Browse button , select the file that you want to upload, and then click Open.
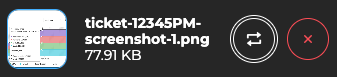
  3. When the upload is complete and the success message appears, click Close.

Result: The file name and size appear in the Attachment data type field. You can display detailed information about the file, including the type, size, upload date, or image preview when available, by clicking the Info icon .

Because of how the files in the Attachment fields are stored, you cannot reuse them between records, tables, or apps, and they are not visible on the All assets page.

Note: For image files, Caspio generates a thumbnail image to use as a preview in the Datasheet. The image file size displayed in the details pane is the total size of the original image and the image files generated additionally, including the thumbnail image and the Smart resizer files.

Dialog box showing details of a sample PDF file attachment.

Steps for managing attachments in the Datasheet:

  1. Open a table where you want to view or edit the uploaded files.
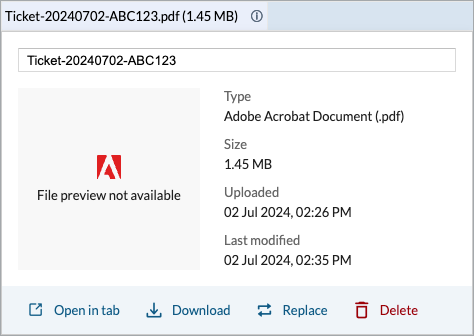
  2. On the Datasheet tab, in the Attachment data type field, click the Info icon .
  3. In the preview pane, select one of the available actions:
    • To change the file name, in the text field, enter the new name.
    • To view the complete file, click the Open in tab link.
    • To save the file on your hard drive, click Download.
    • To upload a different file in this field, click Replace, select the new file that you want to upload, and then click Open.
    • To remove the file from the field, click Delete.